window系统的家庭版无法安装Docker Desktop,网上很多的解决方案大多建议更改window的版本为专业或者商业的版本,或者是使用主流的虚拟机,再在里面嵌套docker。其实还有一个比较简单的办法,就是使用window内置的wsl(适用于windows的Linux子系统)功能。然后再在其子系统中安装docker,wsl子系统的好处是可以硬件直通。
一、WSL的安装
wsl的安装需要安装3个windows组件:
- Hyper-V
- 适用于Linux的Windows子系统
- 虚拟机平台
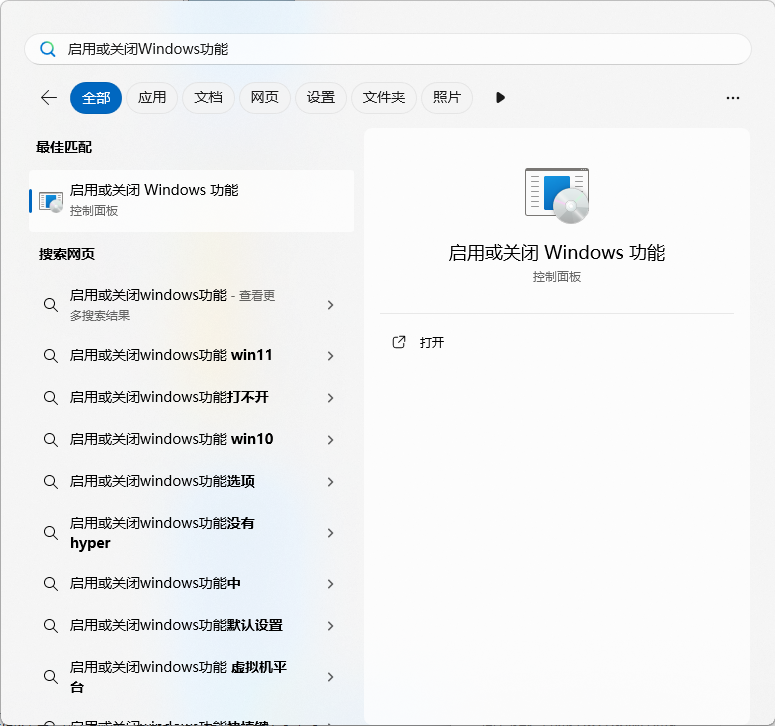
首先使用【win+s】组合键,在搜索栏中搜【启用或关闭Windows功能】
打开【启用或关闭Windows功能】,在窗口中勾选【Hyper-V】、【适用于Linux的Windows子系统】、【虚拟机平台】三个功能
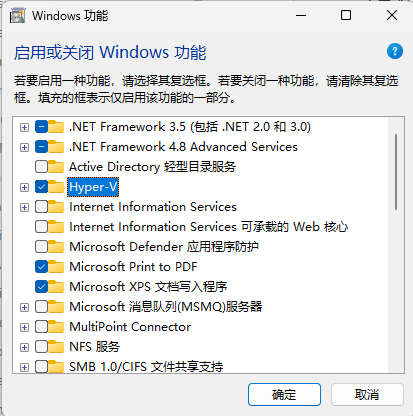
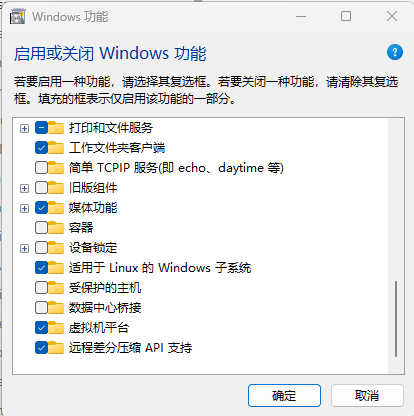
之后点击【确定】按钮进入Windows功能的安装。
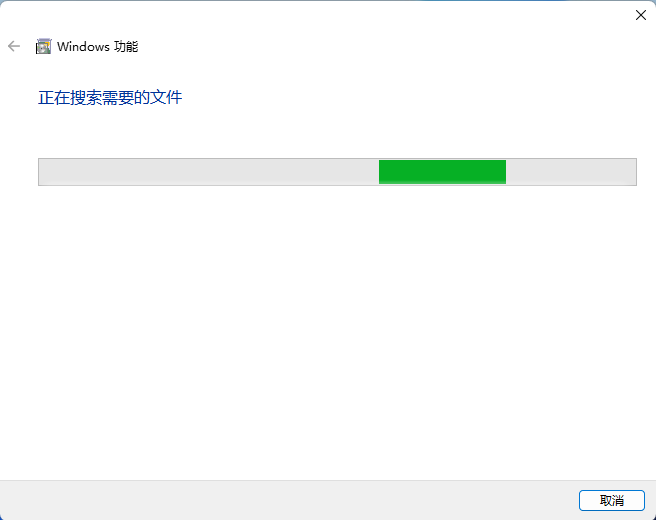
安装完成后需要重启电脑完成更改。
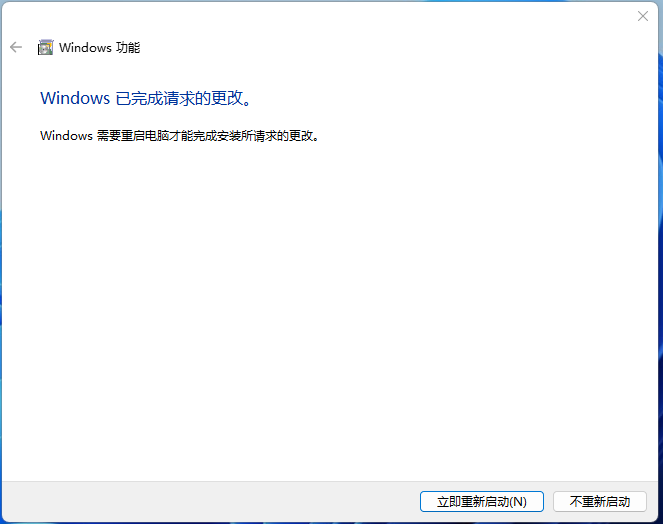
重启后wsl的安装更改算是完成了,这个时候可以使用--update更新一下wsl
PS C:\Users\sean> wsl --update
正在安装: 适用于 Linux 的 Windows 子系统
[                           0.0%                           ]
如果直接就安装子系统,可能会报一下的错误,
PS C:\Windows\system32> wsl --install
适用于 Linux 的 Windows 子系统已安装。

无法解析服务器的名称或地址
二、hosts文件配置
出现【无法解析服务器的名称或地址】这个错误,是一位DNS的问题,无法访问raw.githubusercontent.com这个域名。通过 https://site.ip138.com/raw.githubusercontent.com/ 这个网站查找raw.githubusercontent.com这个域名的可用IP。
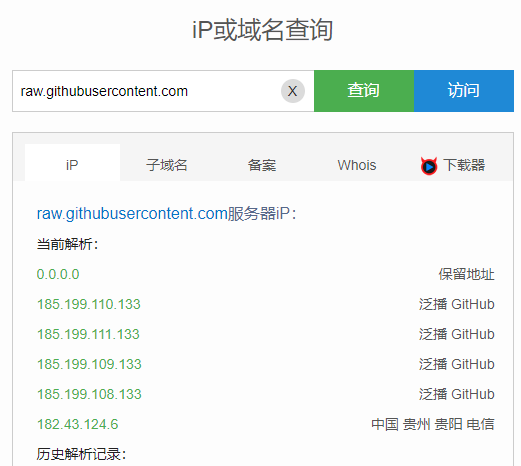
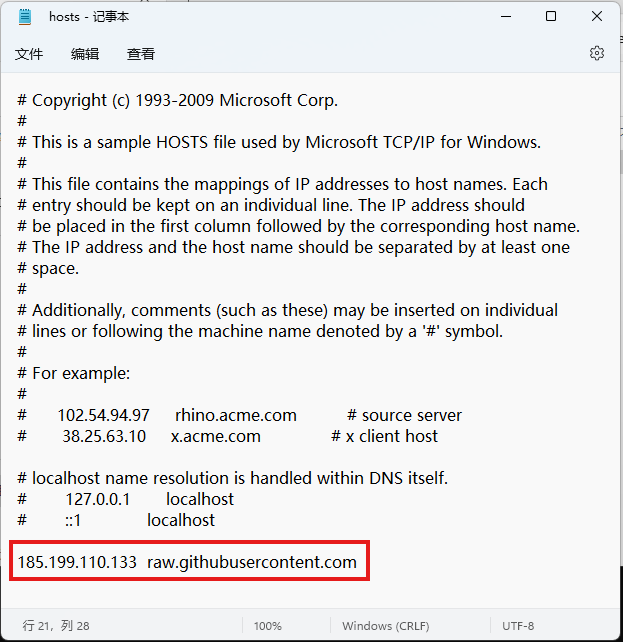
将查询到的泛播GitHub地址添加到hosts文件中。
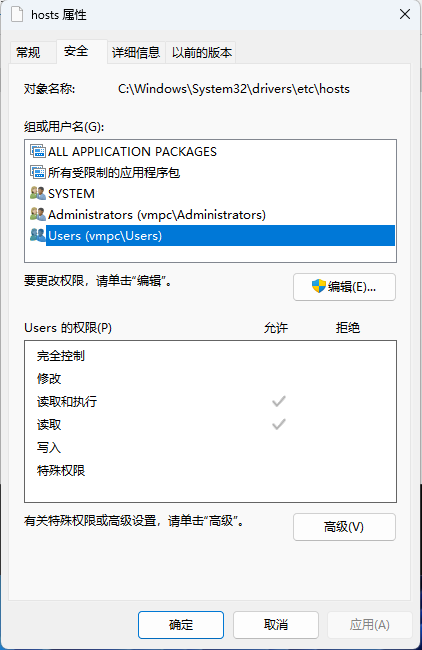
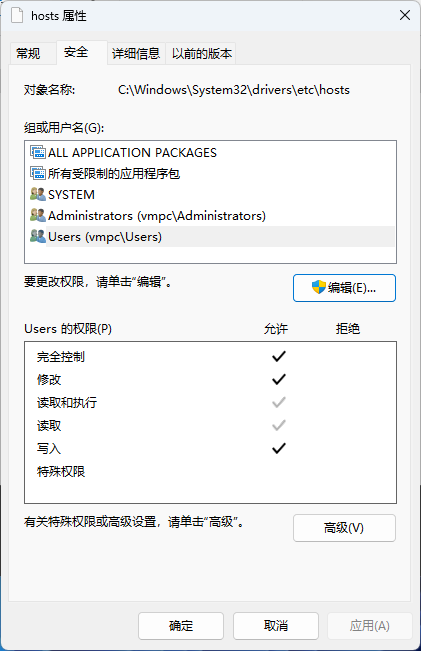
如果修改hosts文件提示无法报错,可以在安全中修改User的权限来实现。
修改前的权限
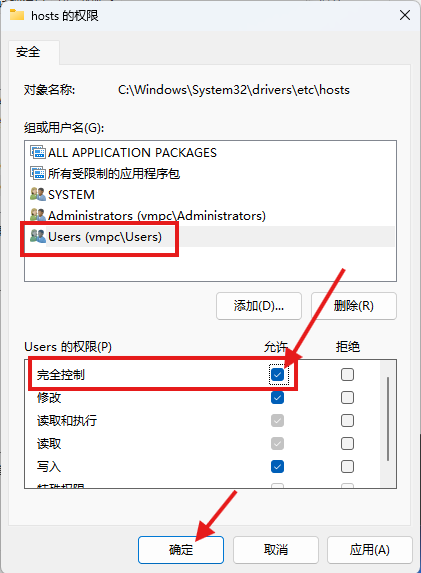
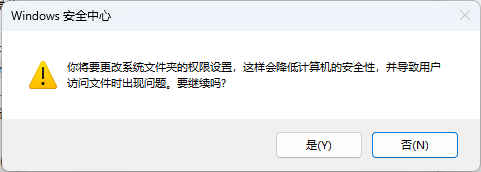
选择【安全标签】,在【组或用户名】中选择【Users(主机名\Users)】,然后点击【编辑】,在弹出的对话框中,选择【Users(主机名\Users)】,在下面的【Users的权限】,勾选【完全控制】后面【允许】的多选框。最后点击【确定】。
安全提示选择【是】
修改完成后的权限如下:
配置完成后,hosts文件的修改就可以在文件中保存了。
在hosts文件中添加一条上面查询到的raw.githubusercontent.com域名的IP映射,然后保存文件。
三、更新wsl
配置完成后,更新wsl,打开PowerShell
PS C:\Windows\system32> wsl --update
正在安装: 适用于 Linux 的 Windows 子系统
已安装 适用于 Linux 的 Windows 子系统。
更新完成后查看wsl的版本信息
PS C:\Windows\system32> wsl --version
WSL 版本: 2.2.4.0
内核版本: 5.15.153.1-2
WSLg 版本: 1.0.61
MSRDC 版本: 1.2.5326
Direct3D 版本: 1.611.1-81528511
DXCore 版本: 10.0.26091.1-240325-1447.ge-release
Windows 版本: 10.0.22631.3880
至此,wsl的安装就完成了,功能也可以正常使用。
四、拉取ubuntu子系统
先查看在线支持的子系统有那些
PS C:\Windows\system32> wsl --list --online
以下是可安装的有效分发的列表。
使用 'wsl.exe --install <Distro>' 安装。

NAME                            FRIENDLY NAME
Ubuntu                          Ubuntu
Debian                          Debian GNU/Linux
kali-linux                      Kali Linux Rolling
Ubuntu-18.04                    Ubuntu 18.04 LTS
Ubuntu-20.04                    Ubuntu 20.04 LTS
Ubuntu-22.04                    Ubuntu 22.04 LTS
Ubuntu-24.04                    Ubuntu 24.04 LTS
OracleLinux_7_9                 Oracle Linux 7.9
OracleLinux_8_7                 Oracle Linux 8.7
OracleLinux_9_1                 Oracle Linux 9.1
openSUSE-Leap-15.6              openSUSE Leap 15.6
SUSE-Linux-Enterprise-15-SP5    SUSE Linux Enterprise 15 SP5
SUSE-Linux-Enterprise-15-SP6    SUSE Linux Enterprise 15 SP6
openSUSE-Tumbleweed             openSUSE Tumbleweed
可以看到,支持的子系统不少,这里演示拉取最新的ubuntu2404LTS版本,使用命令wsl --install <子系统名>来安装子系统,子系统名使用的是上面wsl --list --online中列出的NAME。安装完成后,根据提示输入一个ubuntu的用户名,以及输入密码和确认输入密码后,就可以看见熟悉的linux命令行提示符,用户名是你刚才输入的用户名,主机名则是你Windows的主机名。
PS C:\Windows\system32> wsl --install ubuntu-24.04
正在安装: Ubuntu 24.04 LTS
已安装 Ubuntu 24.04 LTS。
正在启动 Ubuntu 24.04 LTS...
Installing, this may take a few minutes...
Please create a default UNIX user account. The username does not need to match your Windows username.
For more information visit: https://aka.ms/wslusers
Enter new UNIX username: sean
New password:
Retype new password:
passwd: password updated successfully
Installation successful!
To run a command as administrator (user "root"), use "sudo <command>".
See "man sudo_root" for details.

Welcome to Ubuntu 24.04 LTS (GNU/Linux 5.15.153.1-microsoft-standard-WSL2 x86_64)

 * Documentation:  https://help.ubuntu.com
 * Management:     https://landscape.canonical.com
 * Support:        https://ubuntu.com/pro

 System information as of Wed Aug 28 23:22:42 CST 2024

  System load:  1.31                Processes:             35
  Usage of /:   0.1% of 1006.85GB   Users logged in:       0
  Memory usage: 20%                 IPv4 address for eth0: 172.27.66.213
  Swap usage:   0%


This message is shown once a day. To disable it please create the
/home/sean/.hushlogin file.
sean@vmpc:~$
五、子系统中安装docker
上面的步骤为安装子系统时自动进入子系统的命令行,那么如何运行打开一个子系统呢?
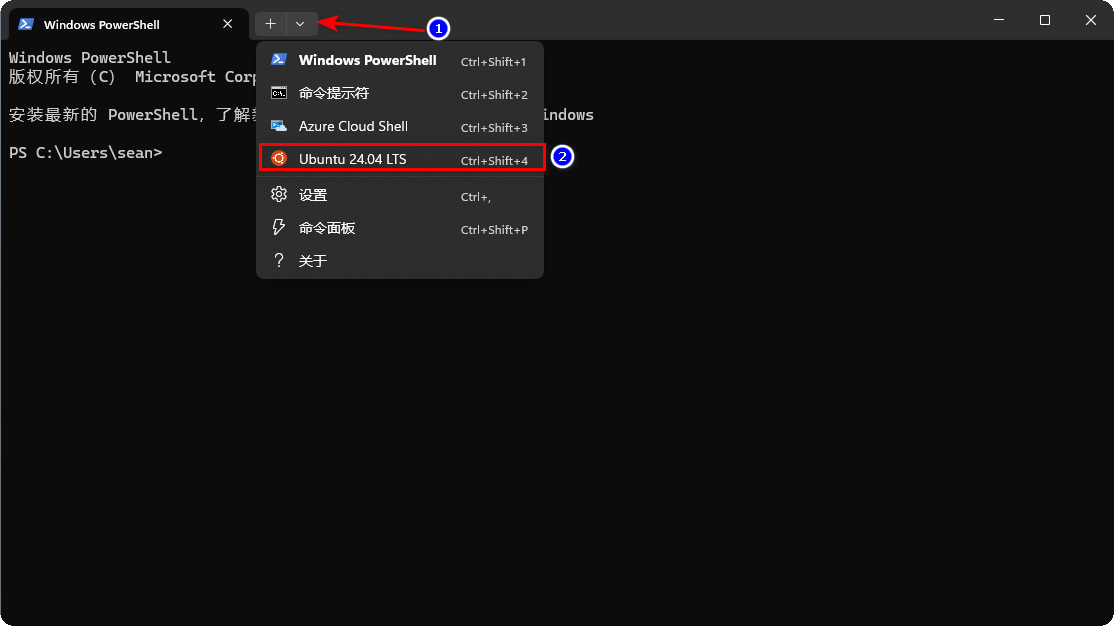
首先打开PowerShell窗口,点击当前标签旁边的下拉菜单按键,下拉菜单中有我们当前已经安装的子系统名称,点击名称即可进入到对应的子系统中去。
进入系统后,直接使用apt包管理命令安装docker.io就可以了,需要注意的是,在debian一系的apt软件仓库中,docker这个名字是指向另外一个软件,咱们要用的docker-ce的包名字是docker.io。
sudo apt install docker.io
查看docker的版本,确定docker已经安装完成
sean@vmpc:~$ sudo docker version
Client:
 Version:           24.0.7
 API version:       1.43
 Go version:        go1.22.2
 Git commit:        24.0.7-0ubuntu4.1
 Built:             Fri Aug  9 02:33:20 2024
 OS/Arch:           linux/amd64
 Context:           default

Server:
 Engine:
  Version:          24.0.7
  API version:      1.43 (minimum version 1.12)
  Go version:       go1.22.2
  Git commit:       24.0.7-0ubuntu4.1
  Built:            Fri Aug  9 02:33:20 2024
  OS/Arch:          linux/amd64
  Experimental:     false
 containerd:
  Version:          1.7.12
  GitCommit:
 runc:
  Version:          1.1.12-0ubuntu3.1
  GitCommit:
 docker-init:
  Version:          0.19.0
  GitCommit:
六、配置docker并使用
1、docker安装完成后,如果不想每次在输入命令前都要加上sudo的话,运行下面的命令
sudo usermod -aG docker $USER && newgrp docker
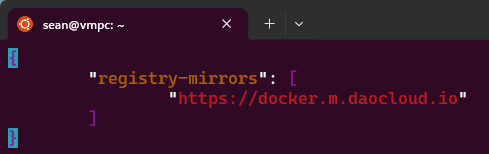
2、配置国内仓库源或自己的私有仓库源,在/etc/docker/daemon.json文件中添加以下的内容即可。配置完成后需要重启docker的服务sudo systemctl restart docker方可生效。
"registry-mirrors": [
    "https://国内可用仓库的域名",
    "https://私有仓库的IP:端口"
  ]
3、配置docker在子系统启动的时候跟着自启动
sudo systemctl enable docker
七、拉取镜像并测试运行容器
拉取一个容量比较小的镜像,测试一下是否可以正常拉取镜像,
sean@vmpc:~$ docker pull alpine
Using default tag: latest
latest: Pulling from library/alpine
43c4264eed91: Pull complete
Digest: sha256:beefdbd8a1da6d2915566fde36db9db0b524eb737fc57cd1367effd16dc0d06d
Status: Downloaded newer image for alpine:latest
docker.io/library/alpine:latest
sean@vmpc:~$ docker images
REPOSITORY   TAG       IMAGE ID       CREATED       SIZE
alpine       latest    91ef0af61f39   3 weeks ago   7.8MB
利用这个镜像创建一个容器
sean@vmpc:~$ docker run -it --name hello alpine:latest echo "hello world"
hello world
sean@vmpc:~$ docker ps -a
CONTAINER ID   IMAGE           COMMAND                CREATED          STATUS                     PORTS     NAMES
7e1eabd6e985   alpine:latest   "echo 'hello world'"   10 seconds ago   Exited (0) 7 seconds ago
hello
如果以上都可以正常运行,恭喜你,你已经可以在家庭版的window下面使用docker了。而且是显卡直通的那种。