简介
Kubernetes是Google 2014年创建管理的,是Google 10多年大规模容器管理技术Borg的开源版本。它是容器集群管理系统,是一个开源的平台,可以实现容器集群的自动化部署、自动扩缩容、维护等功能。
通过Kubernetes你可以:
-
快速部署应用
-
快速扩展应用
-
无缝对接新的应用功能
-
节省资源,优化硬件资源的使用
Kubernetes 特点:
-
可移植: 支持公有云,私有云,混合云,多重云(multi-cloud)
-
可扩展: 模块化, 插件化, 可挂载, 可组合
-
自动化: 自动部署,自动重启,自动复制,自动伸缩/扩展
快速搭建
1. 安装要求
在开始之前,部署Kubernetes集群机器需要满足以下几个条件:
3台以上机器,操作系统 CentOS7.9以上64位系统
-
硬件配置:2GB或更多RAM,2个CPU或更多CPU,硬盘40GB或更多
-
集群中所有机器之间网络互通
-
可以访问外网,需要拉取镜像
-
禁止swap分区
2. 部署内容
kubernetes1.28.2版本,docker26.1版本
在所有节点上安装Docker和kubeadm,kubenet
部署Kubernetes Master
部署容器网络插件
部署 Kubernetes Node,将节点加入Kubernetes集群中
3. 准备环境
这里我准备了三台机器
centos版本不要太低否则可能会出问题(建议和本篇一样使用7.9)
ip: 192.168.41.61 主机名:k8s-node01 系统:centos7.9 配置:2核2G
ip: 192.168.41.62 主机名:k8s-node02 系统:centos7.9 配置:2核2G
ip: 192.168.41.63 主机名:k8s-node03 系统:centos7.9 配置:2核2G
三台主机都需要执行如下命令
CentOS7已经停止官方的支持了,需要添加国内的阿里源或者其他源。
curl -s -o /etc/yum.repos.d/CentOS-Base.repo https://mirrors.aliyun.com/repo/Centos-7.repo

# 更新仓库
yum clean all
yum makecache
yum repolist

# 安装以下软件
yum install -y wget vim
关闭防火墙和selinux
systemctl stop firewalld
systemctl disable firewalld

sed -i 's/^SELINUX=enforcing/SELINUX=disabled/' /etc/selinux/config
setenforce 0
关闭swap分区
swapoff -a    # 临时关闭
vim /etc/fstab # 注释到swap那一行  永久关闭
添加主机名与IP对应关系(三台主机都执行)
echo '''
192.168.41.61 k8s-node01
192.168.41.62 k8s-node02
192.168.41.63 k8s-node03
''' >> /etc/hosts
各自修改主机名(从61-63各自顺序执行)
hostnamectl set-hostname k8s-node01
hostnamectl set-hostname k8s-node01
hostnamectl set-hostname k8s-node01
将桥接的IPv4流量传递到iptables的链(三台主机都执行):
以下net.ipv4.ip_forward如存在=0,修改为1即可
cat <<EOF | sudo tee /etc/modules-load.d/k8s.conf
overlay
br_netfilter
EOF

modprobe overlay
modprobe br_netfilter


cat > /etc/sysctl.d/k8s.conf << EOF
net.ipv4.ip_forward = 1
net.ipv4.tcp_tw_recycle = 0
net.bridge.bridge-nf-call-ip6tables = 1
net.bridge.bridge-nf-call-iptables = 1
EOF

sysctl --system
所有机器升级内核到最新
详细内核升级步骤:linux(centos7)内核升级 (低内核会导致docker和k8s运行不稳定)
4. 所有节点安装Docker/kubeadm/kubelet
Docker安装
添加docker的仓库源,默认的centos仓库源里面docker版本非常旧,不适合搭建kubernetes使用,需要使用docker新的仓库源安装新版本的docker。
安装yum-utils
[root@k8s-node-61 ~]# yum install -y yum-utils
已加载插件:fastestmirror
Loading mirror speeds from cached hostfile
 * base: mirrors.aliyun.com
 * elrepo: hkg.mirror.rackspace.com
 * extras: mirrors.ustc.edu.cn
 * updates: mirrors.ustc.edu.cn
软件包 yum-utils-1.1.31-54.el7_8.noarch 已安装并且是最新版本
无须任何处理
安装仓库源
yum-config-manager --add-repo http://mirrors.aliyun.com/docker-ce/linux/centos/docker-ce.repo
下面是官网的, 上面使用阿里云的 国内比较快
yum-config-manager --add-repo https://download.docker.com/linux/centos/docker-ce.repo

[root@k8s-node-61 ~]# yum-config-manager \
>     --add-repo \
>     http://mirrors.aliyun.com/docker-ce/linux/centos/docker-ce.repo
已加载插件:fastestmirror
adding repo from: http://mirrors.aliyun.com/docker-ce/linux/centos/docker-ce.repo
grabbing file http://mirrors.aliyun.com/docker-ce/linux/centos/docker-ce.repo to /etc/yum.repos.d/docker-ce.repo
repo saved to /etc/yum.repos.d/docker-ce.repo
安装Docker
[root@k8s-node-61 ~]# yum install -y docker docker-cli containerd.io
已加载插件:fastestmirror
Loading mirror speeds from cached hostfile
 * base: mirrors.aliyun.com
 * elrepo: hkg.mirror.rackspace.com
 * extras: mirrors.ustc.edu.cn
 * updates: mirrors.ustc.edu.cn
docker-ce-stable                                                                                             | 3.5 kB  00:00:00
正在解决依赖关系
--> 正在检查事务
---> 软件包 containerd.io.x86_64.0.1.6.31-3.1.el7 将被 升级
---> 软件包 containerd.io.x86_64.0.1.6.32-3.1.el7 将被 更新
---> 软件包 docker-ce.x86_64.3.26.1.1-1.el7 将被 升级
---> 软件包 docker-ce.x86_64.3.26.1.3-1.el7 将被 更新
---> 软件包 docker-ce-cli.x86_64.1.26.1.1-1.el7 将被 升级
---> 软件包 docker-ce-cli.x86_64.1.26.1.3-1.el7 将被 更新
--> 解决依赖关系完成

依赖关系解决

====================================================================================================================================
 Package                         架构                     版本                             源                                  大小
====================================================================================================================================
正在更新:
 containerd.io                   x86_64                   1.6.32-3.1.el7                   docker-ce-stable                    35 M
 docker-ce                       x86_64                   3:26.1.3-1.el7                   docker-ce-stable                    27 M
 docker-ce-cli                   x86_64                   1:26.1.3-1.el7                   docker-ce-stable                    15 M

事务概要
====================================================================================================================================
升级  3 软件包

总下载量:77 M
Downloading packages:
Delta RPMs disabled because /usr/bin/applydeltarpm not installed.
(1/3): docker-ce-26.1.3-1.el7.x86_64.rpm                                                                     |  27 MB  00:00:57
(2/3): containerd.io-1.6.32-3.1.el7.x86_64.rpm                                                               |  35 MB  00:01:26
(3/3): docker-ce-cli-26.1.3-1.el7.x86_64.rpm                                                                 |  15 MB  00:00:30
------------------------------------------------------------------------------------------------------------------------------------
总计                                                                                                905 kB/s |  77 MB  00:01:27
Running transaction check
Running transaction test
Transaction test succeeded
Running transaction
  正在更新    : 1:docker-ce-cli-26.1.3-1.el7.x86_64                                                                             1/6
  正在更新    : containerd.io-1.6.32-3.1.el7.x86_64                                                                             2/6
  正在更新    : 3:docker-ce-26.1.3-1.el7.x86_64                                                                                 3/6
  清理        : 3:docker-ce-26.1.1-1.el7.x86_64                                                                                 4/6
  清理        : containerd.io-1.6.31-3.1.el7.x86_64                                                                             5/6
  清理        : 1:docker-ce-cli-26.1.1-1.el7.x86_64                                                                             6/6
  验证中      : containerd.io-1.6.32-3.1.el7.x86_64                                                                             1/6
  验证中      : 3:docker-ce-26.1.3-1.el7.x86_64                                                                                 2/6
  验证中      : 1:docker-ce-cli-26.1.3-1.el7.x86_64                                                                             3/6
  验证中      : 1:docker-ce-cli-26.1.1-1.el7.x86_64                                                                             4/6
  验证中      : containerd.io-1.6.31-3.1.el7.x86_64                                                                             5/6
  验证中      : 3:docker-ce-26.1.1-1.el7.x86_64                                                                                 6/6

更新完毕:
  containerd.io.x86_64 0:1.6.32-3.1.el7         docker-ce.x86_64 3:26.1.3-1.el7         docker-ce-cli.x86_64 1:26.1.3-1.el7

完毕!
如果config.toml文件的内容为空,使用下面的命令去生成
containerd config default > /etc/containerd/config.toml
配置 systemd cgroup 驱动
在 /etc/containerd/config.toml 中设置
sed -i 's/SystemdCgroup = false/SystemdCgroup = true/g' /etc/containerd/config.toml
就是下面的这个位置
[plugins."io.containerd.grpc.v1.cri".containerd.runtimes.runc]
  ...
  [plugins."io.containerd.grpc.v1.cri".containerd.runtimes.runc.options]
    SystemdCgroup = true
将sandbox_image下载地址改为阿里云地址
  [plugins."io.containerd.grpc.v1.cri"]
    ...
    sandbox_image = "registry.aliyuncs.com/google_containers/pause:3.9"
启动containerd 并设置开机自启动
systemctl restart containerd && systemctl enable containerd
5. 添加k8s阿里云YUM软件源
所有机器执行
cat > /etc/yum.repos.d/kubernetes.repo << EOF
[kubernetes]
name=Kubernetes
baseurl=https://mirrors.aliyun.com/kubernetes/yum/repos/kubernetes-el7-x86_64
enabled=1
gpgcheck=0
repo_gpgcheck=0
gpgkey=https://mirrors.aliyun.com/kubernetes/yum/doc/yum-key.gpg https://mirrors.aliyun.com/kubernetes/yum/doc/rpm-package-key.gpg
EOF
安装kubeadm,kubelet和kubectl
所有机器执行
yum install -y kubelet-1.28.2 kubeadm-1.28.2 kubectl-1.28.2 --disableexcludes=kubernetes

systemctl start kubelet
systemctl enable kubelet
6. 部署k8s的master和node节点
部署master节点,在192.168.41.61执行
初始化master节点
[root@k8s-node01 ~]# kubeadm init   --apiserver-advertise-address=192.168.10.71 --image-repository registry.aliyuncs.com/google_containers   --kubernetes-version v1.28.2   --service-cidr=10.100.0.0/16 --pod-network-cidr=10.200.0.0/16
[init] Using Kubernetes version: v1.28.0
[preflight] Running pre-flight checks
[preflight] Pulling images required for setting up a Kubernetes cluster
[preflight] This might take a minute or two, depending on the speed of your internet connection
[preflight] You can also perform this action in beforehand using 'kubeadm config images pull'
[certs] Using certificateDir folder "/etc/kubernetes/pki"
[certs] Generating "ca" certificate and key
[certs] Generating "apiserver" certificate and key
[certs] apiserver serving cert is signed for DNS names [k8s-node01 kubernetes kubernetes.default kubernetes.default.svc kubernetes.default.svc.cluster.local] and IPs [10.100.0.1 192.168.41.61]
[certs] Generating "apiserver-kubelet-client" certificate and key
[certs] Generating "front-proxy-ca" certificate and key
[certs] Generating "front-proxy-client" certificate and key
[certs] Generating "etcd/ca" certificate and key
[certs] Generating "etcd/server" certificate and key
[certs] etcd/server serving cert is signed for DNS names [k8s-node01 localhost] and IPs [192.168.41.61 127.0.0.1 ::1]
[certs] Generating "etcd/peer" certificate and key
[certs] etcd/peer serving cert is signed for DNS names [k8s-node01 localhost] and IPs [192.168.41.61 127.0.0.1 ::1]
[certs] Generating "etcd/healthcheck-client" certificate and key
[certs] Generating "apiserver-etcd-client" certificate and key
[certs] Generating "sa" key and public key
[kubeconfig] Using kubeconfig folder "/etc/kubernetes"
[kubeconfig] Writing "admin.conf" kubeconfig file
[kubeconfig] Writing "kubelet.conf" kubeconfig file
[kubeconfig] Writing "controller-manager.conf" kubeconfig file
[kubeconfig] Writing "scheduler.conf" kubeconfig file
[etcd] Creating static Pod manifest for local etcd in "/etc/kubernetes/manifests"
[control-plane] Using manifest folder "/etc/kubernetes/manifests"
[control-plane] Creating static Pod manifest for "kube-apiserver"
[control-plane] Creating static Pod manifest for "kube-controller-manager"
[control-plane] Creating static Pod manifest for "kube-scheduler"
[kubelet-start] Writing kubelet environment file with flags to file "/var/lib/kubelet/kubeadm-flags.env"
[kubelet-start] Writing kubelet configuration to file "/var/lib/kubelet/config.yaml"
[kubelet-start] Starting the kubelet
[wait-control-plane] Waiting for the kubelet to boot up the control plane as static Pods from directory "/etc/kubernetes/manifests". This can take up to 4m0s
[apiclient] All control plane components are healthy after 7.503994 seconds
[upload-config] Storing the configuration used in ConfigMap "kubeadm-config" in the "kube-system" Namespace
[kubelet] Creating a ConfigMap "kubelet-config" in namespace kube-system with the configuration for the kubelets in the cluster
[upload-certs] Skipping phase. Please see --upload-certs
[mark-control-plane] Marking the node k8s-node01 as control-plane by adding the labels: [node-role.kubernetes.io/control-plane node.kubernetes.io/exclude-from-external-load-balancers]
[mark-control-plane] Marking the node k8s-node01 as control-plane by adding the taints [node-role.kubernetes.io/control-plane:NoSchedule]
[bootstrap-token] Using token: tsz1yg.b3msuhmy08g6snwp
[bootstrap-token] Configuring bootstrap tokens, cluster-info ConfigMap, RBAC Roles
[bootstrap-token] Configured RBAC rules to allow Node Bootstrap tokens to get nodes
[bootstrap-token] Configured RBAC rules to allow Node Bootstrap tokens to post CSRs in order for nodes to get long term certificate credentials
[bootstrap-token] Configured RBAC rules to allow the csrapprover controller automatically approve CSRs from a Node Bootstrap Token
[bootstrap-token] Configured RBAC rules to allow certificate rotation for all node client certificates in the cluster
[bootstrap-token] Creating the "cluster-info" ConfigMap in the "kube-public" namespace
[kubelet-finalize] Updating "/etc/kubernetes/kubelet.conf" to point to a rotatable kubelet client certificate and key
[addons] Applied essential addon: CoreDNS
[addons] Applied essential addon: kube-proxy

Your Kubernetes control-plane has initialized successfully!

To start using your cluster, you need to run the following as a regular user:

  mkdir -p $HOME/.kube
  sudo cp -i /etc/kubernetes/admin.conf $HOME/.kube/config
  sudo chown $(id -u):$(id -g) $HOME/.kube/config

Alternatively, if you are the root user, you can run:

  export KUBECONFIG=/etc/kubernetes/admin.conf

You should now deploy a pod network to the cluster.
Run "kubectl apply -f [podnetwork].yaml" with one of the options listed at:
  https://kubernetes.io/docs/concepts/cluster-administration/addons/

Then you can join any number of worker nodes by running the following on each as root:

kubeadm join 192.168.41.61:6443 --token tsz1yg.b3msuhmy08g6snwp \
        --discovery-token-ca-cert-hash sha256:c123a51e8c6eccf18af89dad6826e37b4a0f4c21e427a91515bc0faf205395f0
网段问题,两个网段不要重,后面是/16,不要与当前机器网段一样
这里执行完会生成一串命令用于node节点的加入,记录下来,接着执行以下命令
mkdir -p $HOME/.kube
cp -i /etc/kubernetes/admin.conf $HOME/.kube/config
chown $(id -u):$(id -g) $HOME/.kube/config
部署node节点,在192.168.41.62和63执行
这里复制上面生成的一串命令,我这里只是示例,命令根据你实际生成的复制去node节点执行
kubeadm join 192.168.41.61:6443 --token tsz1yg.b3msuhmy08g6snwp \
        --discovery-token-ca-cert-hash sha256:c123a51e8c6eccf18af89dad6826e37b4a0f4c21e427a91515bc0faf205395f0
查看节点的信息
[root@k8s-node01 ~]# kubectl get node
NAME         STATUS     ROLES           AGE     VERSION
k8s-node01   NotReady   control-plane   6m40s   v1.28.2
k8s-node02   NotReady   <none>          3m51s   v1.28.2
k8s-node03   NotReady   <none>          3m41s   v1.28.2
7. 安装网络插件(CNI)
虽然现在有了master和node节点,但是所有节点状态都是NotReady,这是因为没有CNI网络插件。
下载CNI插件
wget https://github.com/containernetworking/plugins/releases/download/v1.3.0/cni-plugins-linux-amd64-v1.3.0.tgz
mkdir -pv /opt/cni/bin
tar zxvf cni-plugins-linux-amd64-v1.3.0.tgz -C /opt/cni/bin/
运行结果:
[root@k8s-node01 ~]# wget https://github.com/containernetworking/plugins/releases/download/v1.3.0/cni-plugins-linux-amd64-v1.3.0.tgz--2024-06-03 11:07:58--  https://github.com/containernetworking/plugins/releases/download/v1.3.0/cni-plugins-linux-amd64-v1.3.0.tgz
正在解析主机 github.com (github.com)... 20.205.243.166
正在连接 github.com (github.com)|20.205.243.166|:443... 已连接。
已发出 HTTP 请求,正在等待回应... 302 Found
位置:https://objects.githubusercontent.com/github-production-release-asset-2e65be/84575398/d1ad8456-0aa1-4bb9-84e3-4e03286b4e9f?X-Amz-Algorithm=AWS4-HMAC-SHA256&X-Amz-Credential=releaseassetproduction%2F20240603%2Fus-east-1%2Fs3%2Faws4_request&X-Amz-Date=20240603T030759Z&X-Amz-Expires=300&X-Amz-Signature=25dee1d2cf0c93d5f3ca2dcce583bd1fe7628fdb84806ca79a83082edf749412&X-Amz-SignedHeaders=host&actor_id=0&key_id=0&repo_id=84575398&response-content-disposition=attachment%3B%20filename%3Dcni-plugins-linux-amd64-v1.3.0.tgz&response-content-type=application%2Foctet-stream [跟随至新的 URL]
--2024-06-03 11:07:59--  https://objects.githubusercontent.com/github-production-release-asset-2e65be/84575398/d1ad8456-0aa1-4bb9-84e3-4e03286b4e9f?X-Amz-Algorithm=AWS4-HMAC-SHA256&X-Amz-Credential=releaseassetproduction%2F20240603%2Fus-east-1%2Fs3%2Faws4_request&X-Amz-Date=20240603T030759Z&X-Amz-Expires=300&X-Amz-Signature=25dee1d2cf0c93d5f3ca2dcce583bd1fe7628fdb84806ca79a83082edf749412&X-Amz-SignedHeaders=host&actor_id=0&key_id=0&repo_id=84575398&response-content-disposition=attachment%3B%20filename%3Dcni-plugins-linux-amd64-v1.3.0.tgz&response-content-type=application%2Foctet-stream
正在解析主机 objects.githubusercontent.com (objects.githubusercontent.com)... 185.199.109.133, 185.199.111.133, 185.199.110.133, ...
正在连接 objects.githubusercontent.com (objects.githubusercontent.com)|185.199.109.133|:443... 已连接。
已发出 HTTP 请求,正在等待回应... 200 OK
长度:45338194 (43M) [application/octet-stream]
正在保存至: “cni-plugins-linux-amd64-v1.3.0.tgz”

100%[==========================================================================================>] 45,338,194  8.26MB/s 用时 33s

2024-06-03 11:08:34 (1.30 MB/s) - 已保存 “cni-plugins-linux-amd64-v1.3.0.tgz” [45338194/45338194])

[root@k8s-node01 ~]# mkdir -pv /opt/cni/bin
[root@k8s-node01 ~]# tar zxvf cni-plugins-linux-amd64-v1.3.0.tgz -C /opt/cni/bin/
./
./loopback
./bandwidth
./ptp
./vlan
./host-device
./tuning
./vrf
./sbr
./tap
./dhcp
./static
./firewall
./macvlan
./dummy
./bridge
./ipvlan
./portmap
./host-local
master安装flannel
kubectl apply -f https://raw.githubusercontent.com/coreos/flannel/master/Documentation/kube-flannel.yml
如果无法直接访问这个文件,可以新建一个kube-flannel.yml的文件,添加以下内容:
---
kind: Namespace
apiVersion: v1
metadata:
  name: kube-flannel
  labels:
    k8s-app: flannel
    pod-security.kubernetes.io/enforce: privileged
---
kind: ClusterRole
apiVersion: rbac.authorization.k8s.io/v1
metadata:
  labels:
    k8s-app: flannel
  name: flannel
rules:
- apiGroups:
  - ""
  resources:
  - pods
  verbs:
  - get
- apiGroups:
  - ""
  resources:
  - nodes
  verbs:
  - get
  - list
  - watch
- apiGroups:
  - ""
  resources:
  - nodes/status
  verbs:
  - patch
---
kind: ClusterRoleBinding
apiVersion: rbac.authorization.k8s.io/v1
metadata:
  labels:
    k8s-app: flannel
  name: flannel
roleRef:
  apiGroup: rbac.authorization.k8s.io
  kind: ClusterRole
  name: flannel
subjects:
- kind: ServiceAccount
  name: flannel
  namespace: kube-flannel
---
apiVersion: v1
kind: ServiceAccount
metadata:
  labels:
    k8s-app: flannel
  name: flannel
  namespace: kube-flannel
---
kind: ConfigMap
apiVersion: v1
metadata:
  name: kube-flannel-cfg
  namespace: kube-flannel
  labels:
    tier: node
    k8s-app: flannel
    app: flannel
data:
  cni-conf.json: |
    {
      "name": "cbr0",
      "cniVersion": "0.3.1",
      "plugins": [
        {
          "type": "flannel",
          "delegate": {
            "hairpinMode": true,
            "isDefaultGateway": true
          }
        },
        {
          "type": "portmap",
          "capabilities": {
            "portMappings": true
          }
        }
      ]
    }
  net-conf.json: |
    {
      "Network": "10.200.0.0/16",
      "EnableNFTables": false,
      "Backend": {
        "Type": "vxlan"
      }
    }
---
apiVersion: apps/v1
kind: DaemonSet
metadata:
  name: kube-flannel-ds
  namespace: kube-flannel
  labels:
    tier: node
    app: flannel
    k8s-app: flannel
spec:
  selector:
    matchLabels:
      app: flannel
  template:
    metadata:
      labels:
        tier: node
        app: flannel
    spec:
      affinity:
        nodeAffinity:
          requiredDuringSchedulingIgnoredDuringExecution:
            nodeSelectorTerms:
            - matchExpressions:
              - key: kubernetes.io/os
                operator: In
                values:
                - linux
      hostNetwork: true
      priorityClassName: system-node-critical
      tolerations:
      - operator: Exists
        effect: NoSchedule
      serviceAccountName: flannel
      initContainers:
      - name: install-cni-plugin
        image: docker.io/flannel/flannel-cni-plugin:v1.4.1-flannel1
        command:
        - cp
        args:
        - -f
        - /flannel
        - /opt/cni/bin/flannel
        volumeMounts:
        - name: cni-plugin
          mountPath: /opt/cni/bin
      - name: install-cni
        image: docker.io/flannel/flannel:v0.25.3
        command:
        - cp
        args:
        - -f
        - /etc/kube-flannel/cni-conf.json
        - /etc/cni/net.d/10-flannel.conflist
        volumeMounts:
        - name: cni
          mountPath: /etc/cni/net.d
        - name: flannel-cfg
          mountPath: /etc/kube-flannel/
      containers:
      - name: kube-flannel
        image: docker.io/flannel/flannel:v0.25.3
        command:
        - /opt/bin/flanneld
        args:
        - --ip-masq
        - --kube-subnet-mgr
        resources:
          requests:
            cpu: "100m"
            memory: "50Mi"
        securityContext:
          privileged: false
          capabilities:
            add: ["NET_ADMIN", "NET_RAW"]
        env:
        - name: POD_NAME
          valueFrom:
            fieldRef:
              fieldPath: metadata.name
        - name: POD_NAMESPACE
          valueFrom:
            fieldRef:
              fieldPath: metadata.namespace
        - name: EVENT_QUEUE_DEPTH
          value: "5000"
        volumeMounts:
        - name: run
          mountPath: /run/flannel
        - name: flannel-cfg
          mountPath: /etc/kube-flannel/
        - name: xtables-lock
          mountPath: /run/xtables.lock
      volumes:
      - name: run
        hostPath:
          path: /run/flannel
      - name: cni-plugin
        hostPath:
          path: /opt/cni/bin
      - name: cni
        hostPath:
          path: /etc/cni/net.d
      - name: flannel-cfg
        configMap:
          name: kube-flannel-cfg
      - name: xtables-lock
        hostPath:
          path: /run/xtables.lock
          type: FileOrCreate
需要修改这个一段里面的Network的ip段值为你初始化时pod-network-cidr的Ip段:
net-conf.json: |
    {
      "Network": "10.200.0.0/16",
      "EnableNFTables": false,
      "Backend": {
        "Type": "vxlan"
      }
    }
然后执行kubectl apply -f kube-flannel.yml
[root@k8s-node01 ~]# kubectl apply -f kube-flannel.yml
namespace/kube-flannel created
clusterrole.rbac.authorization.k8s.io/flannel created
clusterrolebinding.rbac.authorization.k8s.io/flannel created
serviceaccount/flannel created
configmap/kube-flannel-cfg created
daemonset.apps/kube-flannel-ds created
这个时候再查看节点的状态,就都是ready的状态了
[root@k8s-node01 ~]# kubectl get node
NAME         STATUS   ROLES           AGE   VERSION
k8s-node01   Ready    control-plane   19m   v1.28.2
k8s-node02   Ready    <none>          16m   v1.28.2
k8s-node03   Ready    <none>          16m   v1.28.2
8. 测试kubernetes集群
在Kubernetes集群中创建一个pod,验证是否正常运行
创建一个pod,开放对外端口访问,这里会随机映射一个端口
kubectl create deployment nginx --image=nginx
kubectl expose deployment nginx --port=80 --type=NodePort
查看pod状态,必须是running状态而且ready是1,并查看nginx svc的80端口映射到了哪个端口
[root@k8s-node01 ~]# kubectl get pod,svc
NAME                         READY   STATUS              RESTARTS   AGE
pod/nginx-7854ff8877-fm2vz   0/1     ContainerCreating   0          18s

NAME                 TYPE        CLUSTER-IP       EXTERNAL-IP   PORT(S)        AGE
service/kubernetes   ClusterIP   10.100.0.1       <none>        443/TCP        39m
service/nginx        NodePort    10.100.101.119   <none>        80:31495/TCP   8s
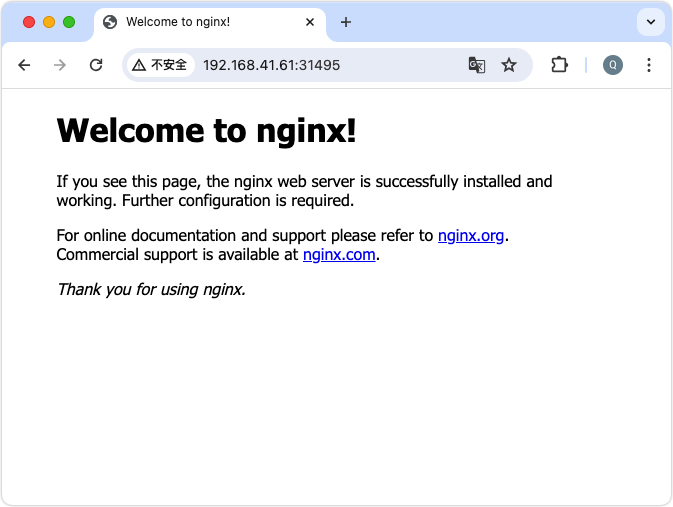
访问任意节点机器的IP加上刚刚查看的映射端口,看看是否nginx已经运行
9. 安装dashborad
下载recommended.yaml文件
kubectl apply -f https://raw.githubusercontent.com/kubernetes/dashboard/v2.7.0/aio/deploy/recommended.yaml
和上面一样,如果不能访问,可以在本地创建recommended.yaml 文件,然后添加下面的内容:
# Copyright 2017 The Kubernetes Authors.
#
# Licensed under the Apache License, Version 2.0 (the "License");
# you may not use this file except in compliance with the License.
# You may obtain a copy of the License at
#
#     http://www.apache.org/licenses/LICENSE-2.0
#
# Unless required by applicable law or agreed to in writing, software
# distributed under the License is distributed on an "AS IS" BASIS,
# WITHOUT WARRANTIES OR CONDITIONS OF ANY KIND, either express or implied.
# See the License for the specific language governing permissions and
# limitations under the License.

apiVersion: v1
kind: Namespace
metadata:
  name: kubernetes-dashboard

---

apiVersion: v1
kind: ServiceAccount
metadata:
  labels:
    k8s-app: kubernetes-dashboard
  name: kubernetes-dashboard
  namespace: kubernetes-dashboard

---

kind: Service
apiVersion: v1
metadata:
  labels:
    k8s-app: kubernetes-dashboard
  name: kubernetes-dashboard
  namespace: kubernetes-dashboard
spec:
  ports:
    - port: 443
      targetPort: 8443
      name: https
      nodePort: 32001
  type: NodePort
  selector:
    k8s-app: kubernetes-dashboard

---

apiVersion: v1
kind: Secret
metadata:
  labels:
    k8s-app: kubernetes-dashboard
  name: kubernetes-dashboard-certs
  namespace: kubernetes-dashboard
type: Opaque

---

apiVersion: v1
kind: Secret
metadata:
  labels:
    k8s-app: kubernetes-dashboard
  name: kubernetes-dashboard-csrf
  namespace: kubernetes-dashboard
type: Opaque
data:
  csrf: ""

---

apiVersion: v1
kind: Secret
metadata:
  labels:
    k8s-app: kubernetes-dashboard
  name: kubernetes-dashboard-key-holder
  namespace: kubernetes-dashboard
type: Opaque

---

kind: ConfigMap
apiVersion: v1
metadata:
  labels:
    k8s-app: kubernetes-dashboard
  name: kubernetes-dashboard-settings
  namespace: kubernetes-dashboard

---

kind: Role
apiVersion: rbac.authorization.k8s.io/v1
metadata:
  labels:
    k8s-app: kubernetes-dashboard
  name: kubernetes-dashboard
  namespace: kubernetes-dashboard
rules:
  # Allow Dashboard to get, update and delete Dashboard exclusive secrets.
  - apiGroups: [""]
    resources: ["secrets"]
    resourceNames: ["kubernetes-dashboard-key-holder", "kubernetes-dashboard-certs", "kubernetes-dashboard-csrf"]
    verbs: ["get", "update", "delete"]
    # Allow Dashboard to get and update 'kubernetes-dashboard-settings' config map.
  - apiGroups: [""]
    resources: ["configmaps"]
    resourceNames: ["kubernetes-dashboard-settings"]
    verbs: ["get", "update"]
    # Allow Dashboard to get metrics.
  - apiGroups: [""]
    resources: ["services"]
    resourceNames: ["heapster", "dashboard-metrics-scraper"]
    verbs: ["proxy"]
  - apiGroups: [""]
    resources: ["services/proxy"]
    resourceNames: ["heapster", "http:heapster:", "https:heapster:", "dashboard-metrics-scraper", "http:dashboard-metrics-scraper"]
    verbs: ["get"]

---

kind: ClusterRole
apiVersion: rbac.authorization.k8s.io/v1
metadata:
  labels:
    k8s-app: kubernetes-dashboard
  name: kubernetes-dashboard
rules:
  # Allow Metrics Scraper to get metrics from the Metrics server
  - apiGroups: ["metrics.k8s.io"]
    resources: ["pods", "nodes"]
    verbs: ["get", "list", "watch"]

---

apiVersion: rbac.authorization.k8s.io/v1
kind: RoleBinding
metadata:
  labels:
    k8s-app: kubernetes-dashboard
  name: kubernetes-dashboard
  namespace: kubernetes-dashboard
roleRef:
  apiGroup: rbac.authorization.k8s.io
  kind: Role
  name: kubernetes-dashboard
subjects:
  - kind: ServiceAccount
    name: kubernetes-dashboard
    namespace: kubernetes-dashboard

---

apiVersion: rbac.authorization.k8s.io/v1
kind: ClusterRoleBinding
metadata:
  name: kubernetes-dashboard
roleRef:
  apiGroup: rbac.authorization.k8s.io
  kind: ClusterRole
  name: kubernetes-dashboard
subjects:
  - kind: ServiceAccount
    name: kubernetes-dashboard
    namespace: kubernetes-dashboard

---

kind: Deployment
apiVersion: apps/v1
metadata:
  labels:
    k8s-app: kubernetes-dashboard
  name: kubernetes-dashboard
  namespace: kubernetes-dashboard
spec:
  replicas: 1
  revisionHistoryLimit: 10
  selector:
    matchLabels:
      k8s-app: kubernetes-dashboard
  template:
    metadata:
      labels:
        k8s-app: kubernetes-dashboard
    spec:
      securityContext:
        seccompProfile:
          type: RuntimeDefault
      containers:
        - name: kubernetes-dashboard
          image: kubernetesui/dashboard:v2.7.0
          imagePullPolicy: Always
          ports:
            - containerPort: 8443
              protocol: TCP
          args:
            - --auto-generate-certificates
            - --namespace=kubernetes-dashboard
            # Uncomment the following line to manually specify Kubernetes API server Host
            # If not specified, Dashboard will attempt to auto discover the API server and connect
            # to it. Uncomment only if the default does not work.
            # - --apiserver-host=http://my-address:port
          volumeMounts:
            - name: kubernetes-dashboard-certs
              mountPath: /certs
              # Create on-disk volume to store exec logs
            - mountPath: /tmp
              name: tmp-volume
          livenessProbe:
            httpGet:
              scheme: HTTPS
              path: /
              port: 8443
            initialDelaySeconds: 30
            timeoutSeconds: 30
          securityContext:
            allowPrivilegeEscalation: false
            readOnlyRootFilesystem: true
            runAsUser: 1001
            runAsGroup: 2001
      volumes:
        - name: kubernetes-dashboard-certs
          secret:
            secretName: kubernetes-dashboard-certs
        - name: tmp-volume
          emptyDir: {}
      serviceAccountName: kubernetes-dashboard
      nodeSelector:
        "kubernetes.io/os": linux
      # Comment the following tolerations if Dashboard must not be deployed on master
      tolerations:
        - key: node-role.kubernetes.io/master
          effect: NoSchedule

---

kind: Service
apiVersion: v1
metadata:
  labels:
    k8s-app: dashboard-metrics-scraper
  name: dashboard-metrics-scraper
  namespace: kubernetes-dashboard
spec:
  ports:
    - port: 8000
      targetPort: 8000
  selector:
    k8s-app: dashboard-metrics-scraper

---

kind: Deployment
apiVersion: apps/v1
metadata:
  labels:
    k8s-app: dashboard-metrics-scraper
  name: dashboard-metrics-scraper
  namespace: kubernetes-dashboard
spec:
  replicas: 1
  revisionHistoryLimit: 10
  selector:
    matchLabels:
      k8s-app: dashboard-metrics-scraper
  template:
    metadata:
      labels:
        k8s-app: dashboard-metrics-scraper
    spec:
      securityContext:
        seccompProfile:
          type: RuntimeDefault
      containers:
        - name: dashboard-metrics-scraper
          image: kubernetesui/metrics-scraper:v1.0.8
          ports:
            - containerPort: 8000
              protocol: TCP
          livenessProbe:
            httpGet:
              scheme: HTTP
              path: /
              port: 8000
            initialDelaySeconds: 30
            timeoutSeconds: 30
          volumeMounts:
          - mountPath: /tmp
            name: tmp-volume
          securityContext:
            allowPrivilegeEscalation: false
            readOnlyRootFilesystem: true
            runAsUser: 1001
            runAsGroup: 2001
      serviceAccountName: kubernetes-dashboard
      nodeSelector:
        "kubernetes.io/os": linux
      # Comment the following tolerations if Dashboard must not be deployed on master
      tolerations:
        - key: node-role.kubernetes.io/master
          effect: NoSchedule
      volumes:
        - name: tmp-volume
          emptyDir: {}
上面的yaml文档中,比在线的原版多了下面的内容,方便暴露端口给外网直接访问:
spec:
  ports:
    - port: 443
      targetPort: 8443
      name: https  # 原版没有name
      nodePort: 32001 # 原版没有nodePort
   type: NodePort # 原版没有nodePort
再执行kubectl apply -f recommended.yaml命令,结果如下:
[root@k8s-node01 ~]# kubectl apply -f recommended.yaml
namespace/kubernetes-dashboard created
serviceaccount/kubernetes-dashboard created
service/kubernetes-dashboard created
secret/kubernetes-dashboard-certs created
secret/kubernetes-dashboard-csrf created
secret/kubernetes-dashboard-key-holder created
configmap/kubernetes-dashboard-settings created
role.rbac.authorization.k8s.io/kubernetes-dashboard created
clusterrole.rbac.authorization.k8s.io/kubernetes-dashboard created
rolebinding.rbac.authorization.k8s.io/kubernetes-dashboard created
clusterrolebinding.rbac.authorization.k8s.io/kubernetes-dashboard created
deployment.apps/kubernetes-dashboard created
service/dashboard-metrics-scraper created
deployment.apps/dashboard-metrics-scraper created
创建kubernetes-dashboard管理员角色,用于有权限访问dashboard服务
本地创建dashboard-adminuser.yaml文件,添加下方的内容
apiVersion: v1
kind: ServiceAccount
metadata:
  name: admin-user
  namespace: kubernetes-dashboard
---
apiVersion: rbac.authorization.k8s.io/v1
kind: ClusterRoleBinding
metadata:
  name: admin-user
roleRef:
  apiGroup: rbac.authorization.k8s.io
  kind: ClusterRole
  name: cluster-admin
subjects:
- kind: ServiceAccount
  name: admin-user
  namespace: kubernetes-dashboard
[root@k8s-node01 ~]# kubectl apply -f dashboard-adminuser.yaml
serviceaccount/admin-user created
clusterrolebinding.rbac.authorization.k8s.io/admin-user created
[root@k8s-node01 ~]# kubectl -n kubernetes-dashboard create token admin-user
eyJhbGciOiJSUzI1NiIsImtpZCI6IktRcV9xVUpMNlpXbHRocmRiMXExT09STG1sN1c2RzJHRFRZUUVBa0tVLUEifQ.eyJhdWQiOlsiaHR0cHM6Ly9rdWJlcm5ldGVzLmRlZmF1bHQuc3ZjLmNsdXN0ZXIubG9jYWwiXSwiZXhwIjoxNzE3NDAyMzMxLCJpYXQiOjE3MTczOTg3MzEsImlzcyI6Imh0dHBzOi8va3ViZXJuZXRlcy5kZWZhdWx0LnN2Yy5jbHVzdGVyLmxvY2FsIiwia3ViZXJuZXRlcy5pbyI6eyJuYW1lc3BhY2UiOiJrdWJlcm5ldGVzLWRhc2hib2FyZCIsInNlcnZpY2VhY2NvdW50Ijp7Im5hbWUiOiJhZG1pbi11c2VyIiwidWlkIjoiOTM2YTRmYTctYWNhMy00MDFkLWI1ZDYtNTdmM2ExZjdiY2ZiIn19LCJuYmYiOjE3MTczOTg3MzEsInN1YiI6InN5c3RlbTpzZXJ2aWNlYWNjb3VudDprdWJlcm5ldGVzLWRhc2hib2FyZDphZG1pbi11c2VyIn0.PJo-lO2xRd8GUsmsEIw9hEskfTjclzpk5HEFc4ldxeaEJkTdQoCCP6GRTWhJzpTB27l81lPilXEGYXmjuOFgFYHTQHN38OyVQbLPnzegPuJle8-Y7Y5ulCtp67wlltVmPdnhtXfyDMZ51TqD8SaZM4s1SEgEt-EsBrYLZmRp1VTJEHKKGVncHv9deIBGMgoNNh3hw9F4Y3LYBcKiOzP2w8VDgmOPxeUg7ax1MvWxUWon348PIzE_64eRmPBvyDmB7odYowPPWYPQzCQfPbfILyyjOG4nhdnjHAm9Sqhu_EmjhJSl9TKFV0wH5CTe_O9hWOjKQrqo2mehG_1OzNHLMA
在浏览器中输入任意一个节点的https://IP:32001
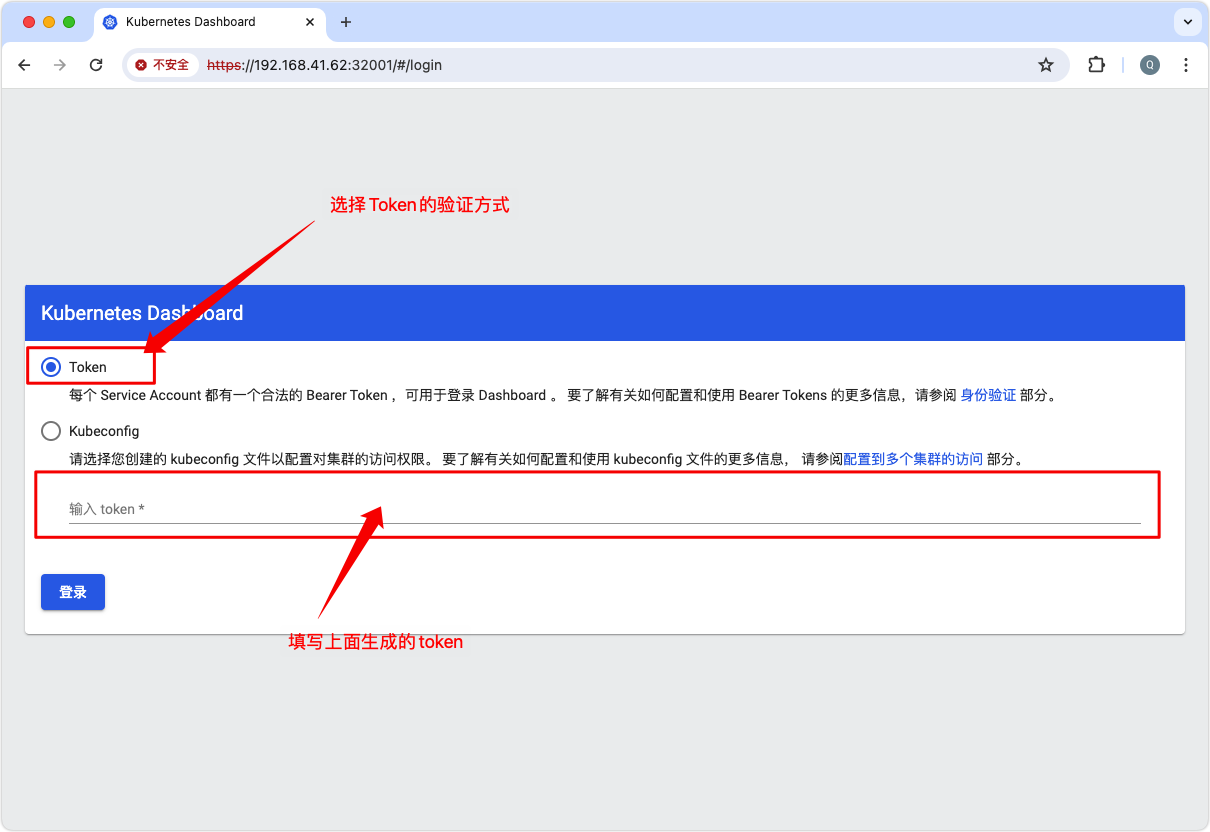
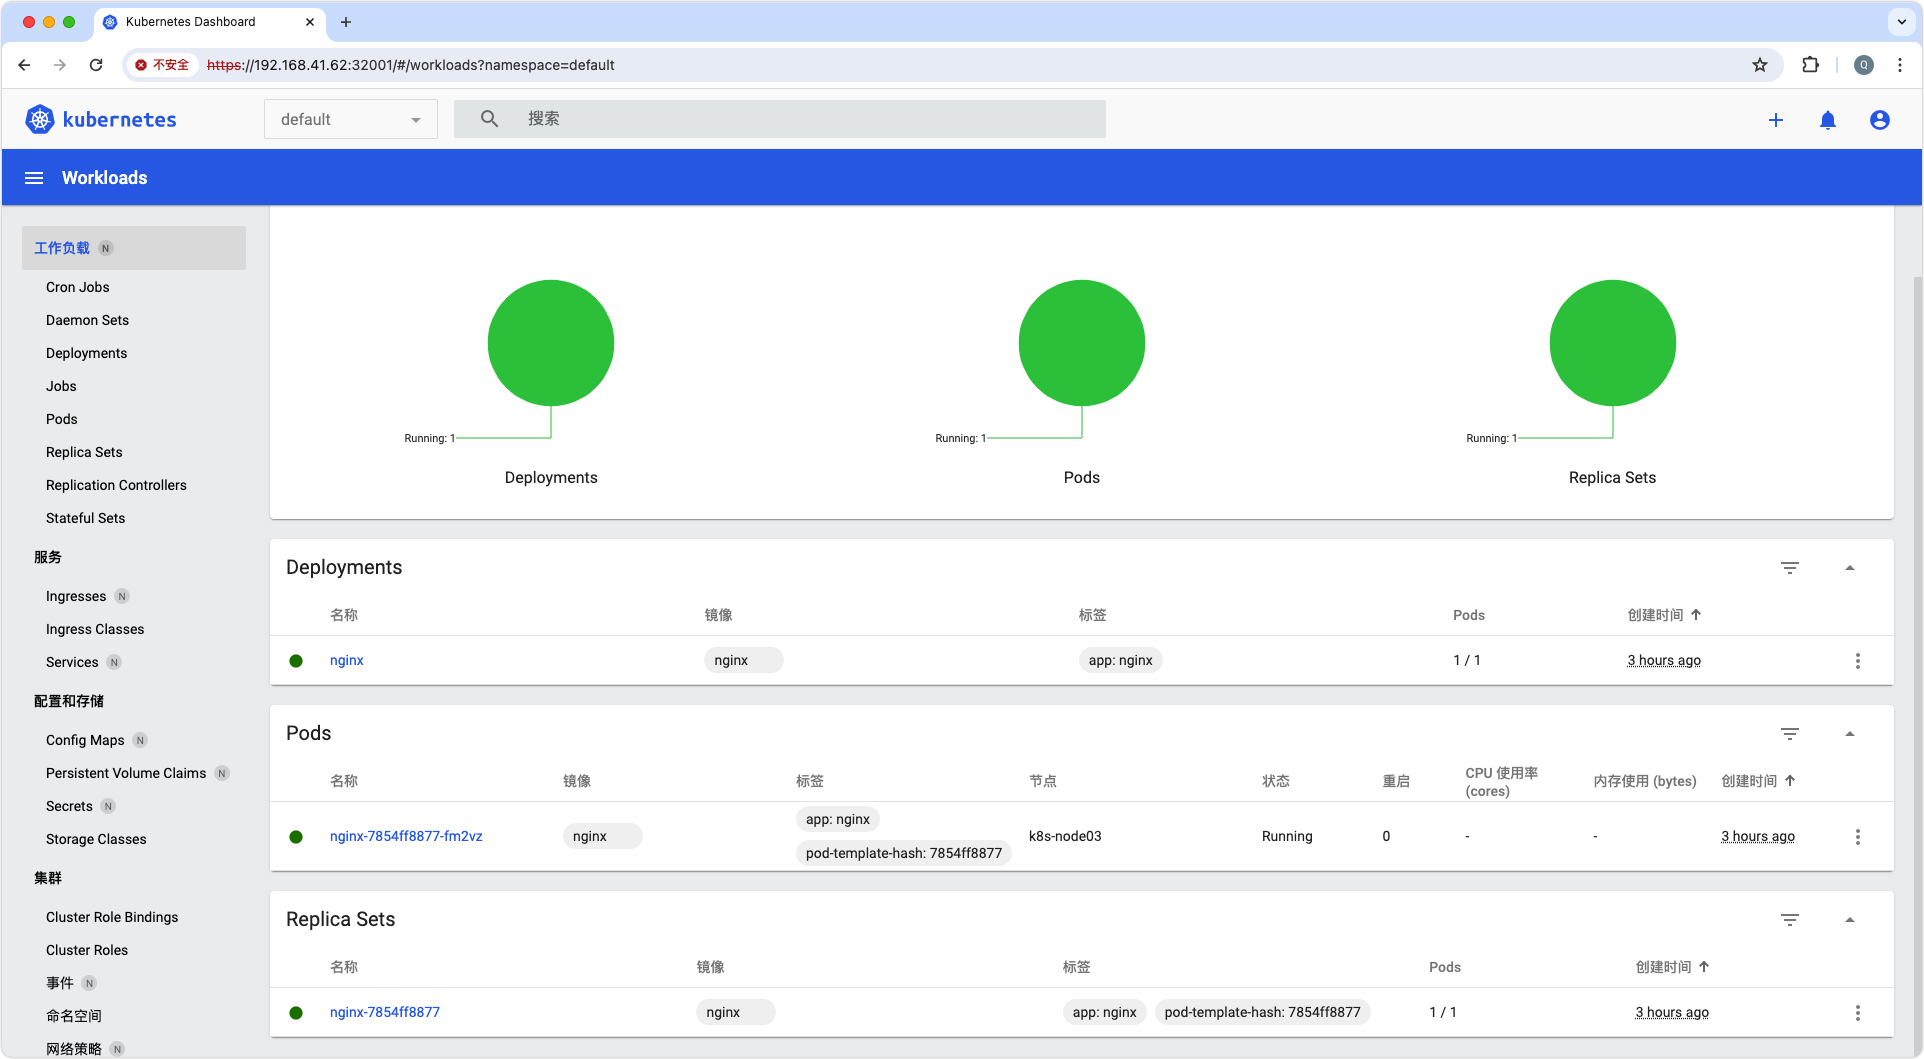
点击登录后,
10. k8s常用命令
查看pod,service,endpoints,secret等等的状态
kubectl get 组件名 # 例如kubectl get pod 查看详细信息可以加上-o wide 其他namespace的指定 -n namespace名
创建,变更一个yaml文件内资源,也可以是目录,目录内包含一组yaml文件(实际使用中都是以yaml文件为主,直接使用命令创建pod的很少,推荐多使用yaml文件)
kubectl apply -f xxx.yaml # 例如kubectl apply -f nginx.yaml 这里是如果没有则创建,如果有则变更,比create好用
删除一个yaml文件内资源,也可以是目录,目录内包含一组yaml文件
kubectl delete -f xxx.yaml # 例如kubectl delete -f nginx.yaml
查看资源状态,比如有一组deployment内的pod没起来,一般用于pod调度过程出现的问题排查
kubectl describe pod pod名 # 先用kubectl get pod查看 有异常的复制pod名使用这个命令
查看pod日志,用于pod状态未就绪的故障排查
kubectl logs pod名 # 先用kubectl get pod查看 有异常的复制pod名使用这个命令
查看node节点或者是pod资源(cpu,内存资源)使用情况
kubectl top 组件名 # 例如kubectl top node kubectl top pod
进入pod内部
kubectl exec -ti pod名 /bin/bash # 先用kubectl get pod查看 有需要的复制pod名使用这个命令